Saturday, February 27, 2010

Retro


Some antique photos ca. 2009.


Click to enlarge.

Sunday, February 21, 2010

The long awaited Sigma SD15 is finally announced. Again.


Here is the brochure with camera specs and a brief history of the Foveon sensor: http://www.sigma-imaging-uk.com/pdfs/SD15%20Brochure.pdf

On paper it looks like a decent upgrade, most of the critical flaws of SD14 fixed, or at least there is some improvement. The camera buffer was increased to 21 RAW files, maximum ISO to 3200 (which probably means usable ISO 800), thew new LCD is 3" and 460K dots (just like my favourite Canon G10!). SD15 shares the same TRUE II image processing engine with DP2 which means better white balance. Everything else is about the same: it still has 4.6 megapixel sensor that is equivalent... not to 14, of course, but about 10 megapixel* of traditional Bayer sensor.

Nothing really exciting and tempting, which is GOOD news. I am not planning to buy any photo gear in the foreseeable future and can patiently wait for prices to drop. Hope it will not take another year before SD15 hits the shelves.

Sigma also announced several new lenses, mostly stabilized versions of existing ones, but there is a unique one with crazy focal length of 8-16 mm! It is the widest rectilinear lens ever made for APS-C cameras. Looks really cool, but I am afraid the price will be prohibitive for amateurs. I think my next lens will be 17-70 OS.

__________________________
*I mean equivalent in resolution only. Besides resolution, Sigma photos have some unique quality, so called Foveon Look™ that no other digital camera nor good old film can match.

Friday, February 5, 2010

How to Shoot "Professionally" with the Canon Powershot G10


At first, this short manual was intended for my friend Tania to whom I lent my Canon G10 for a trip to Europe. Then I decided that it might be interesting for the readers of this blog. It is not for advanced amateurs, but casual street shooters or tourists.

Why did I put "professionally" in quotation marks? Because it doesn't mean: "shoot like a pro", but "shoot in P-mode", which used to be called "program" and now is called "professional". I use P-mode for about 95% of my shooting with the G10 and get the best results with it.

Why Not the "Auto" Mode?

The G10 is a fine camera that in most cases can produce acceptable results in fully automatic mode, but it can't think for you and sometimes makes mistakes. It also has some drawbacks inherent to all compact point & shoot cameras, the most serious being low dynamic range and poor image quality at high ISO. To work around these drawbacks and correct camera's mistakes, manual adjustments are required that can easily be done in P-mode.

The following are a few simple tips that allow you to greatly improve your image quality in comparison with fully automatic shooting:

  • Shoot in P (Professional) mode.
  • Adjust exposure carefully, avoid highlight clipping, use exposure compensation.
  • Check exposure and focus after taking every picture. Reshoot if necessary.
  • Keep ISO sensitivity at minimum
  • Use proper white balance and colour settings.

These tips are explained in detail below.

All this can be applied to Canon G11 as well, except it has better high ISO performance.

All photos of the camera and screenshots © Dpreview.com.
Sample images taken by Tania and me.

How to Shoot "Professionally" with the Canon Powershot G10. – Part II.


Getting Right Exposure

These are my usual settings for outdoor shooting at daytime: P-mode, ISO 80 and exposure compensation -2/3 EV.

Why do you need exposure compensation? The camera has low dynamic range – it means it has problems with high contrast scenes containing both very dark and light areas. Automatic exposure is often calculated incorrectly, and the camera tends to overexpose. In these cases some lighter areas turn out completely white (highlight clipping). You can recover shadow details later in post-processing (though with some graininess and discoloration), but details in white areas are lost permanently and cannot be recovered. If important parts of the scene are clipped, manual exposure compensation is required. Fortunately, the G10 has the dedicated exposure compensation dial on top left of the camera that allows easy adjustments without going to menu. As a rule I set it to -1/3 or -2/3 for outdoor shooting to avoid highlight clipping.

In some cases positive compensation is required. For example, shooting a winter landscape with lots of snow requires exposure compensation about +1 or more. Otherwise it would turn out dark and gray.

When shooting against the light, flash can greatly improve the exposure. Even in bright sunlight use flash to fill shadows and make your photos less contrasty and more pleasing.

You can adjust exposure before taking the picture judging by the screen, but the good idea is to check it afterward, too. After taking a picture, press DISPLAY button to review it. The G10 has 3 review modes that can be switched in cycle by pressing DISPLAY. The first mode is full screen image review, the second shows the little image along with technical information like aperture, shutter speed, ISO, etc. In this mode overexposed (clipped) parts of the image are blinking.


Below the image the histogram is located. It shows distribution of pixel brightness between black (left edge) and white (right edge). It is OK to have lots of black in night shots, but for properly exposed day shots brightness is distributed evenly across the histogram with blacks and whites close to zero.


The third review mode is called Focus Check. A small portion of the image is magnified, and you can navigate across the frame using direction buttons to check focus of different areas.


It is a good habit to check exposure, histogram and focus after each shooting. If any important details of the image are clipped or blurry, delete and reshoot it.

Sometimes clipping cannot be avoided for very contrasty scenes. Try to keep main parts of the image exposed properly and sacrifice insignificant parts. If necessary, shoot several times with different exposure compensation.

In some cases i-contrast can help, but I prefer to avoid it as it makes photos look artificial.


How to Shoot "Professionally" with the Canon Powershot G10 – Part III.


Keeping Minimum ISO

The lower is ISO sensitivity the better is image quality. The G10 produces best quality images at ISO 80-100, good at 200 and acceptable at 400. Increasing ISO introduces digital noise (grain), reduces image sharpness and colour saturation. I don't recommend using ISO 800 and 1600 for colour shooting.


When shooting outdoors during daylight, set ISO to 80. Switch to a higher ISO only if it is getting darker and your images are getting blurry. Keep the image stabilization always on. It reduces camera shake and allows taking sharp photos at shutter speeds as slow as 1/15 or even 1/8 sec. When shooting at dusk or indoors, Auto ISO works fine.


To keep minimum ISO, use a tripod or flash. A mini-tripod is very useful for a tourist. It is light, fits in your coat pocket and can be put on any flat surface like a table or bench.

When shooting with a tripod, use minimum ISO. Pressing the shutter button can introduce camera shake, so it is a good idea to use a delay. Press this button and select 2 sec. delay, it would be enough.


If you purchase the optional Canon RS-60E3 remote release, you can shoot without a delay.

The G10's built-in flash is very powerful, and can be used not only for portrait and interior shots, but outdoors as well. It can produce interesting creative effects. Here are the examples of the same scene shot with and without flash.

Use HI ISO only if it is too dark, and you can use neither tripod nor flash.


The left shot of the clock tower was taken at Auto ISO and 1/60 sec. (too dark); the middle one at Auto ISO and 0.8 sec (too blurry); and the right one at ISO 1600, 1/30 sec. It is properly exposed and not blurry, but look at the 100% crop below!


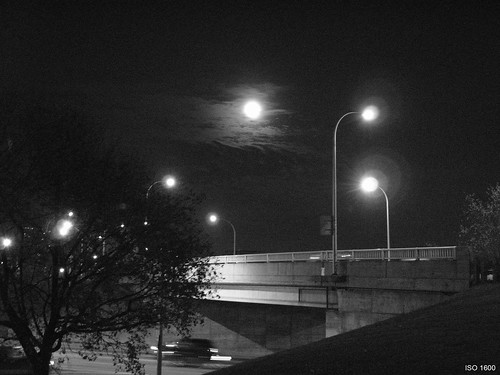
You wouldn't want such a quality for your colour pictures, however black & white ones can turn out good. Here are a couple of examples taken at ISO 800 (top) and 1600 (bottom):

ISO800-sample

ISO1600-sample

Click to enlarge.

How to Shoot "Professionally" with the Canon Powershot G10. – Part IV.


White Balance and Custom Colours

You can't go wrong using Auto White Balance (AWB) most of the time, however, using appropriate white balance presets can improve colour accuracy. Considering weather conditions of Western European winter, the most suitable would be Cloudy. It can also be used under sunlight to make pictures warmer.

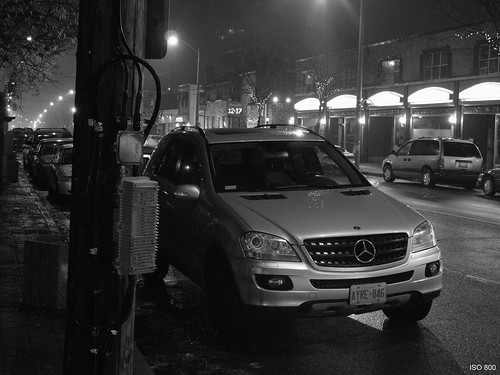
It is subjective, but I think that default colours of the G10 are too dull, and default sharpening is too high. Combined with automatic noise reduction it makes small details and sharp edges look coarse and introduces sharpening halos, which are ugly and difficult to get rid of. Here are 100% crops taken at default sharpening:


To fix this I created the Custom Colour setting with sharpening set to -2 and saturation to +2. Here is an example:


Colour modes also can be selected by pressing FUNC button. You may experiment with different mode (black & white, sepia, etc.) but after that I recommend switching back to the Custom Colour.

Toying with Cars and Time


While Dmitry Popov aka Alzheimer drives back in time, Michael Paul Smith creates the time of his own, and his own toy world seamlessly blended with reality.


Via: http://theonlinephotographer.typepad.com

iPhad


Via: http://www.nu.nl/cache/sevensheaven/